 |
|
 Join Date: Jul 2008
05-17-2011, 1:46 PM
Join Date: Jul 2008
05-17-2011, 1:46 PM
|
Reply
|
|
That looks awesome!
Are you using the same color for +/- throughout? Are you marking the lines or anything - that would make me nervous, lol.
|
|
Join Date: May 2005
05-17-2011, 2:08 PM
|
Reply
|
|
Cool good info to have.
I wondered because the heatshrink looked nice and even giving it a clean finished look. I usually do both but after I crimp, the heatshrink it looks... less than professional.
|
|
Join Date: Apr 2005
05-17-2011, 3:08 PM
|
Reply
|
|
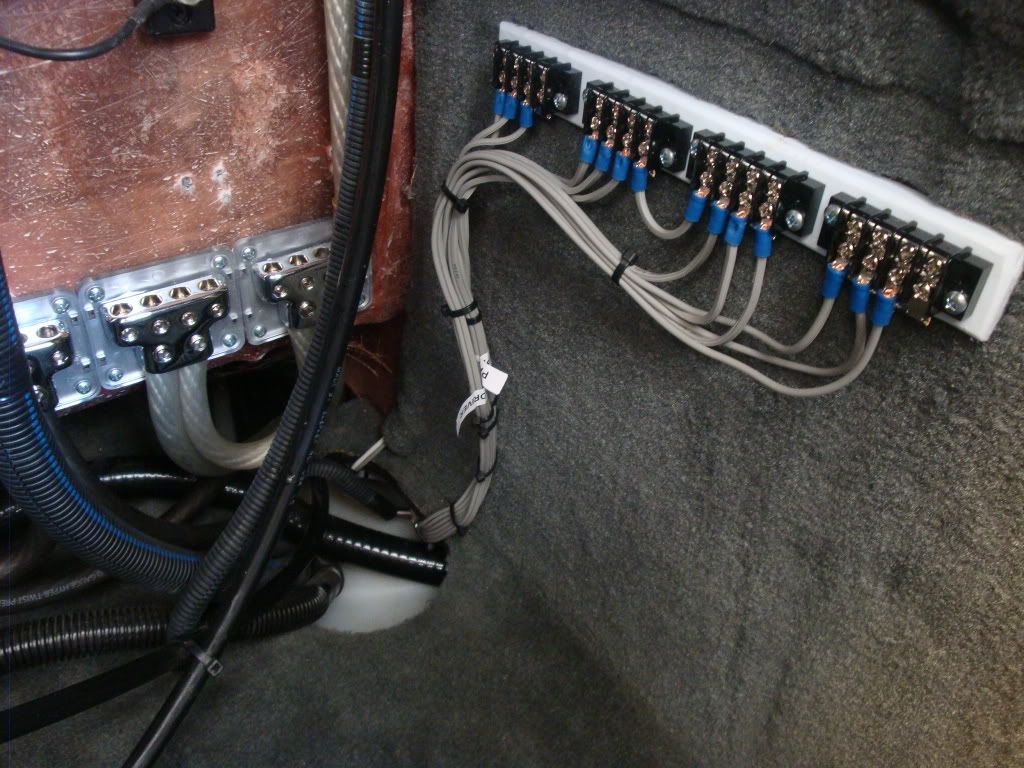
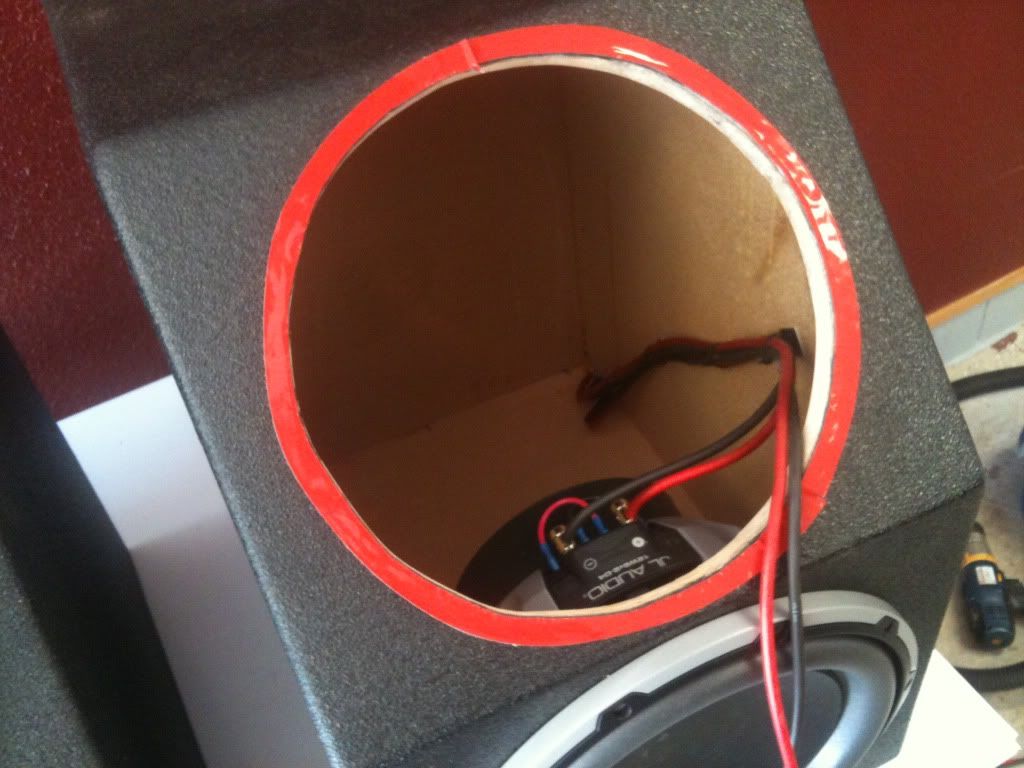
There are two wire colors - grey and black - not sure which is which but you can see it the picture showing the power distribution.
|
|
Join Date: Sep 2005
05-17-2011, 3:40 PM
|
Reply
|
|
^^^I have the same stinger HPM 0 gauge. I don't know why stinger decided on those colors.
|
|
Join Date: Jun 2005
05-17-2011, 9:05 PM
|
Reply
|
I got a few e-mails about makeing ends Here is a short video i shot with my Phone to show how Im doing the ends.
http://www.youtube.com/watch?v=zssIlnwH8dY
|
|
Join Date: Jun 2007
05-17-2011, 9:56 PM
|
Reply
|
|
G - thanks for the video on that. I've always been curious what the best method is. That will definitely help as I wire up my system. Thanks!
|
|
Join Date: Aug 2003
05-17-2011, 11:19 PM
|
Reply
|
Nice work Grant, nice little video.
Not sure why nobody besides me uses wire rated for the application? The engineer in me cringes a bit when I think about all of this hard work going into wire that doesn't have the appropriate jacketing. I use finely stranded marine grade wiring on my boat. The insulation is much more resilient to abrasion than the vinyl coated car wire commonly used. In addition I also only use tinned lugs so they won't turn green after a couple years. Working in the solar industry I see quite a bit more wiring failures than most guys would see in a lifetime so I tend to be a bit over the top when it comes to power wiring.
Here is where I get some of my wire, it also seems a bit heavier than most car wire too.
http://shop.genuinedealz.com/Marine%20Grade%20Wire/
|
|
Join Date: Dec 2006
05-18-2011, 6:27 AM
|
Reply
|
|
Nice job as usual Grant! I just re-did all of my wiring and also used Stinger 0 gauge. Bought some commercial electric lugs, stripped and taped them in place on the cable. Took them to the Deka dealer down the street and he hydraulic crimped them all for $8.
|
|
Join Date: May 2005
05-18-2011, 7:53 AM
|
Reply
|
|
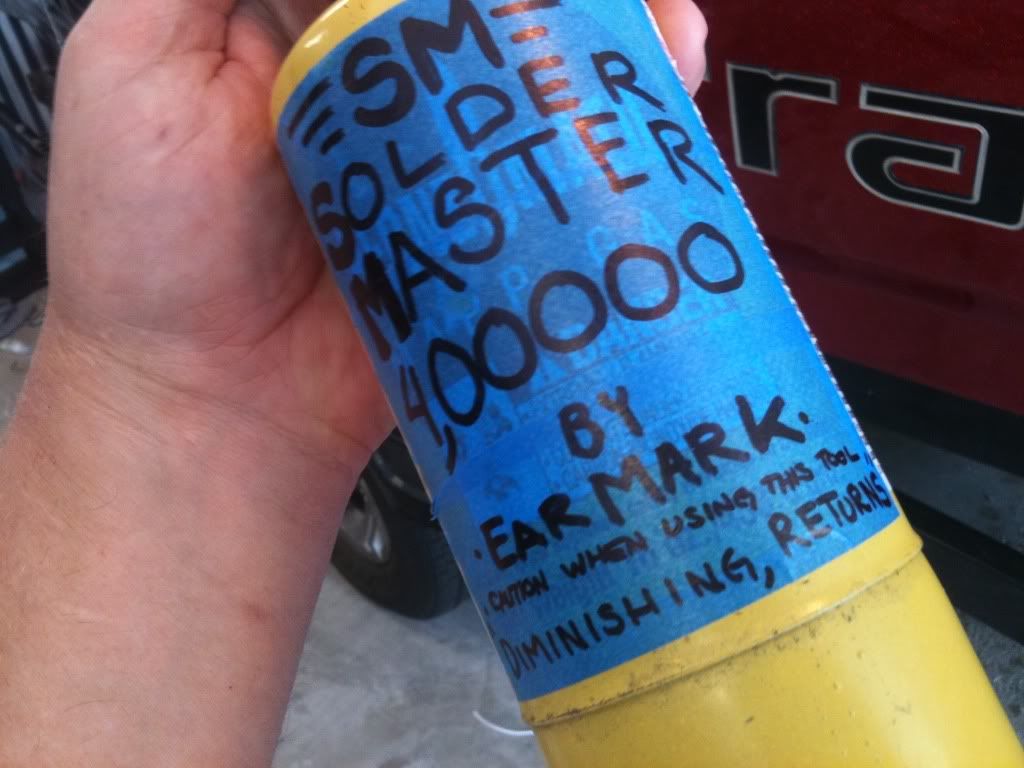
Grant thats a serious torch! What is that? I've been using a standard butane torch but it takes 3 times as long. That torch made short work of that job!
Another way to keep solder from dripping out of the ring of the lug is to do all of the heatup in a bench vice. This keeps solder from dripping out if the ring tight in the vise.
|
|
Join Date: May 2010
05-18-2011, 3:15 PM
|
Reply
|
|
Alright grant, i'm ready to see those 4 W6's installed, where are da pix
|
|
Join Date: Jun 2005
05-18-2011, 6:22 PM
|
Reply
|
|
|
|
Join Date: Mar 2009
05-18-2011, 6:29 PM
|
Reply
|
|
Hey Grant it's Don. Is the boat local. I would love to come by and see it.
|
|
Join Date: Nov 2007
05-18-2011, 6:37 PM
|
Reply
|
|
hahahahahahahahahahahahahahahahahahahahahahahah!!! !!!!!
|
|
Join Date: May 2008
05-19-2011, 2:47 PM
|
Reply
|
|
Grant, I have been soldering my ring terminals on like you have and this project and really like that type of connection. I also try to cover the bare ends of cable in solder before inserting them into terminal blocks/fuse holders. That way I have one solid connection instead of all the tiny strands that can be torn. Does anyone else out there do this or is there a different method I haven't thought about that is used?
|
|
Join Date: May 2005
05-19-2011, 10:11 PM
|
Reply
|
Quote:
Originally Posted by grant_west

newty: Here is a picture of the torch its the SM 4,00000
|
LMAO... Classic! 
|
|
Join Date: Feb 2001
05-20-2011, 10:15 AM
|
Reply
|
|
Grant,
You never cease to amaze me on the execution of these installs. That power distribution pic is a new kind of awesome to me!
|
|
Join Date: Sep 2003
05-21-2011, 10:45 AM
|
Reply
|
|
Grant,
You obviously have a lot of faith in the glue you use...which glue do you like best for this application?
And of course, I love to see the installation, great work!
|
|
Join Date: Mar 2011
05-24-2011, 6:36 AM
|
Reply
|
|
Bump. What glue? Anyone?
|
|
Join Date: Jun 2005
05-24-2011, 12:04 PM
|
Reply
|
|
Sorry this is the 2nd time I tryed to respond from my phone about the glue and some how it didn't go threw.
Glue's
In general Bondo fine strand bondo glass works good. You have to mix it real good and the surface NEEDS to be rough, and you need to press it into the surface your gluing. If you just stick it to a piece of MDF or Plastic it can come right off. Thats why i do the cut lines and holes and sand the pieces Im glueing
Construction glues work great on flat surfaces. You cant or should not put the construction glues like Liquid Nails on to thick or it will never dry, So try and use that stuff in spots where it dosen't have to be stuck in 5 min's and you and use some tape to hold it down or clamp it. Again if there is more than 1/4 inch of glue needed to fill a gap or curve better use Bondo Glass or if its cold outside. Again make sure it's mixed real good and both surfaces are real rough it needs somthing to bight into. Glue's are somthing that's kinda tricky there is not one glue that works good for me for all applications. But if you have any ones I should try out let me know, I know they have some crazy 2 part epoxy's
|
|
Join Date: May 2010
05-24-2011, 1:23 PM
|
Reply
|
|
wheres da pix
|
|
Join Date: Jul 2009
05-24-2011, 4:42 PM
|
Reply
|
|
why sealed?
|
|
Join Date: Nov 2007
05-24-2011, 5:43 PM
|
Reply
|
|
Cannot fit (4) ported under the observer section.
As opposed to 2 drivers ported?
|
|
Join Date: Jun 2005
05-24-2011, 5:46 PM
|
Reply
|
|
I decided to go sealed because we didn't have enough room for 4 12's Ported. and even then it might not have gone ported. With this install I didn't want to play around or experement. I wanted a proven design. If this was my boat and I wanted to tweek and tweek it over time Im sure I could have built and rebult a new box design untill I got somthing I liked. This was not or could not be the case with this install. It had to be right the first time and it has to pound. I turned to My friends and people in the know and this is what we came up with, Chucktronics has done this system in a few X Stars with great results and was nice enough to help me with system design and lay out. He has done much of the R&D on the other X-Stars and was willing to help me on this. I decided to Not re-invent the wheel on Jasons dime & take the advice of a friend who has been down this road before. I cant tell you how many times I have re done my system and how much money I have spent to get my system to where its at. Im confedent in all the products I have picked out and where this thing will end up.
|
|
Join Date: Nov 2007
05-24-2011, 5:47 PM
|
Reply
|
|
Grant - looks like it is coming along well,let me know when your ready to tackle the DSP program. You might want to add some type of dampening material to the interior walls located behind the subs. I know you cannot get into the enclosures once they are mounted in place . Jason should be exteremely happy with the progress!
|
|
Join Date: Apr 2005
05-25-2011, 12:41 PM
|
Reply
|
|
It is safe to say that I am thrilled with the progress. There is such an intense amount of work that goes into these projects, more than a lot of people will ever know. Grant's approach and attention to detail is amazing. I am excited to hear how it sounds/looks once it is all together.
|
|
Join Date: May 2011
05-25-2011, 1:05 PM
|
Reply
|
Quote:
Originally Posted by hatepain
.
-X Star with all the Wet sounds (Chucktronics)
-White and Green Malibu with loads of Arc Audio 6-8 Arc 12's, somwhere around 12 tower speakers Focal I believe, Amps all under plexi on the floor
-8 Tens Centurian with well 8 tens and I believe a 3 some on the tower plus some Pro 60's on the outside
.
|
does anyone know which threads these are, I would like to see them
thanks
|
|
Join Date: May 2010
05-25-2011, 2:09 PM
|
Reply
|
Quote:
Originally Posted by rockstarcustoms
does anyone know which threads these are, I would like to see them
thanks
|
me too
|
|
Join Date: Mar 2006
05-26-2011, 9:28 AM
|
Reply
|
|
|
|
05-26-2011, 9:46 AM
|
Reply
|
|
Is there any internal bracing for the boxes?
|
|
Join Date: Oct 2002
05-26-2011, 9:50 AM
|
Reply
|
|
Whats the price tag on this build?? Pretty amazing!
|
|
Join Date: May 2011
05-26-2011, 9:54 AM
|
Reply
|
|
thanks johnny
|
|
Join Date: Mar 2006
05-26-2011, 10:10 AM
|
Reply
|
|
|
|
Join Date: Jul 2009
05-26-2011, 11:30 AM
|
Reply
|
Quote:
Originally Posted by will5150
Whats the price tag on this build?? Pretty amazing!
|
Think they said the product alone was north of $20k, Will.
|
|
Join Date: May 2010
06-01-2011, 6:09 AM
|
Reply
|
is this thing done yet?
|
|
Join Date: Feb 2008
06-03-2011, 6:09 AM
|
Reply
|
|
How are you charging all the batteries?
|
|
Join Date: Nov 2007
06-03-2011, 6:40 AM
|
Reply
|
|
unvisible- almost done , grant is fabricating the mounting system for fitting 3 devients on the tower . This is a very time consuming project ,as we had the same task when doing Harrold's carbon 210. The build should be done soon and Im sure grant will post the remaining of the pics
|
|
Join Date: Jun 2005
06-05-2011, 6:44 PM
|
Reply
|
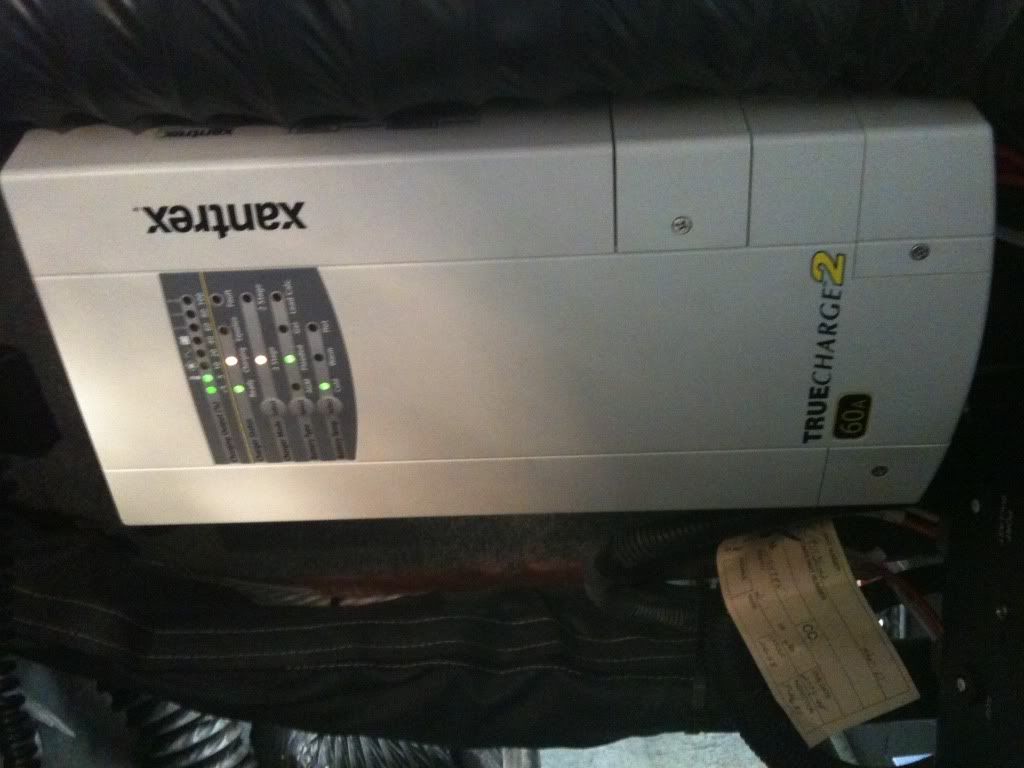
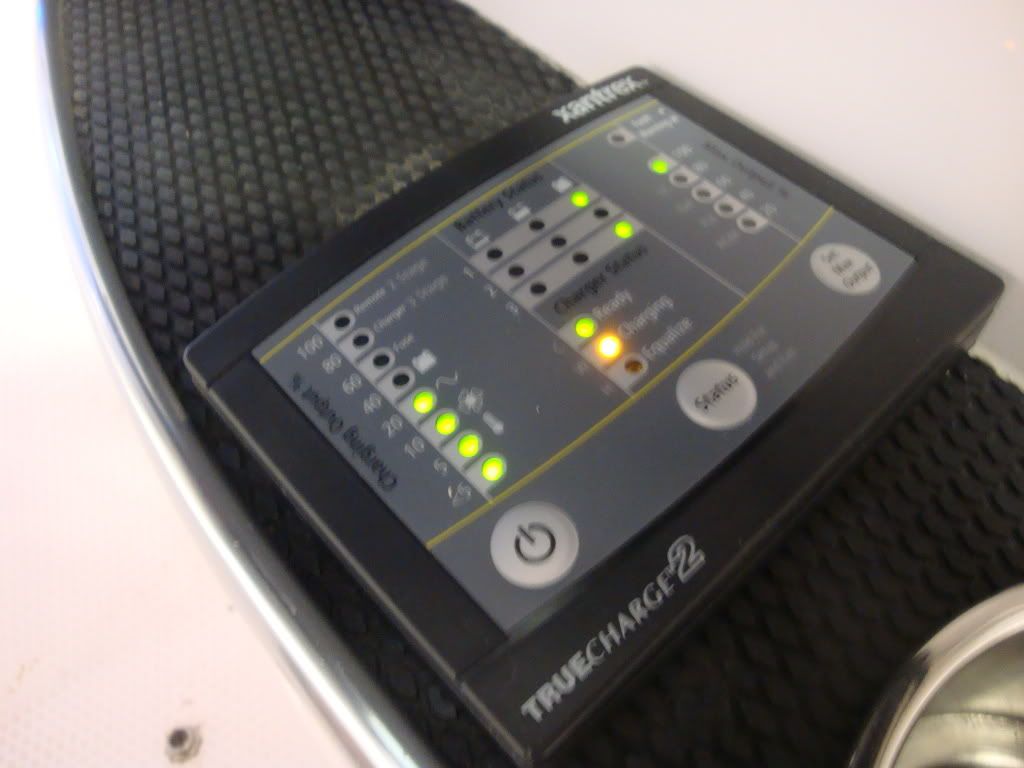
The boat has a Xantex 60 amp 3 Bank On board battery charger. Its mounted on the passenger above the batterys

It has a Dash mounted Remote pannel that will control the State of charge and show you how full each bank is at any time,
I have the same charger in my boat and it works great.
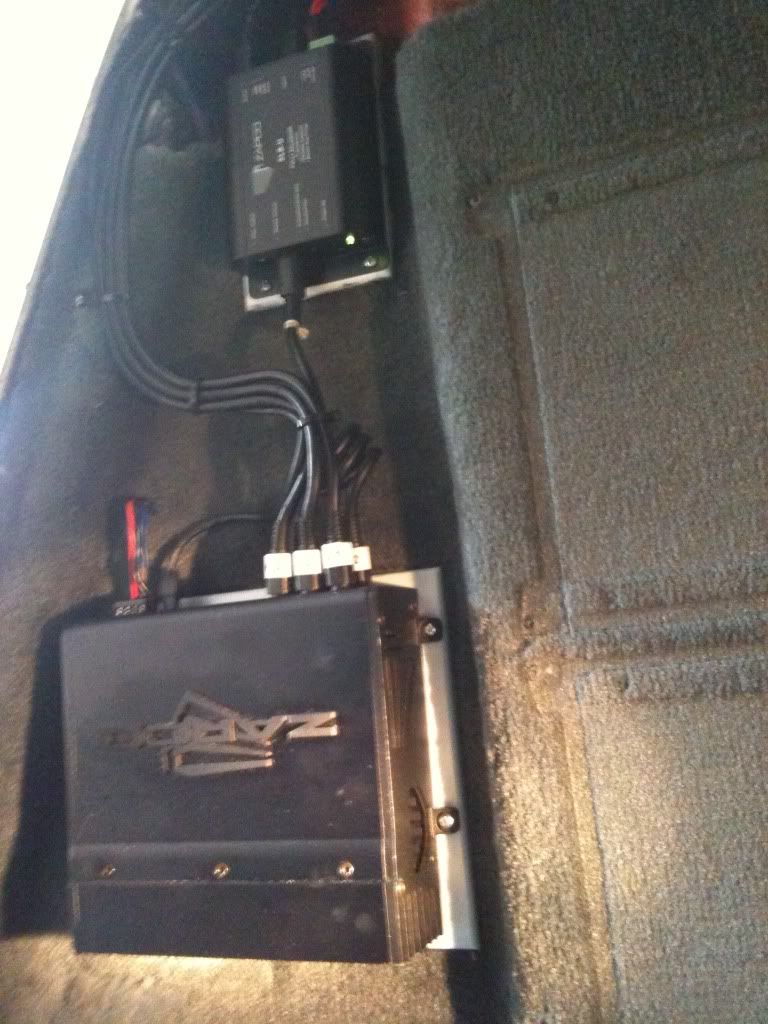
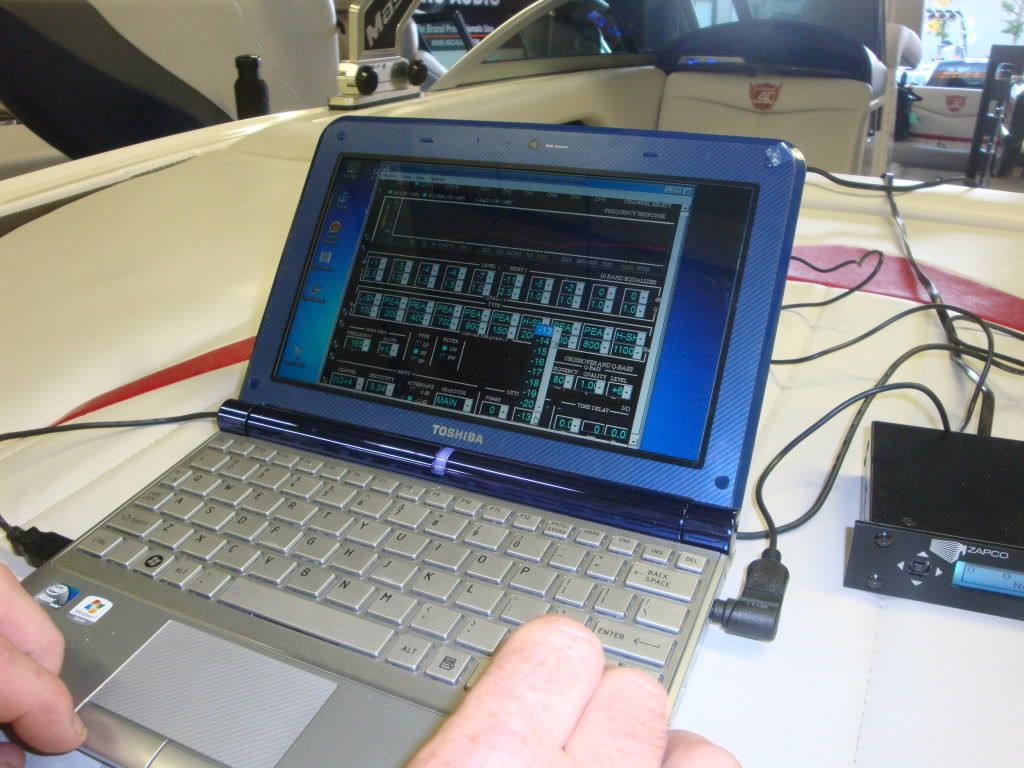
Here is a Pic of the Zapco DSP eq. Above it is the SLB-U volmume. Because this will not have a dash mounted EQ. This SLB-U will work like a Volume control for the Bass. He will have controll of Fade from the Head unit and Dash mounted Remote so he can fade between Tower and hull as well as adjust the Sub woofer,
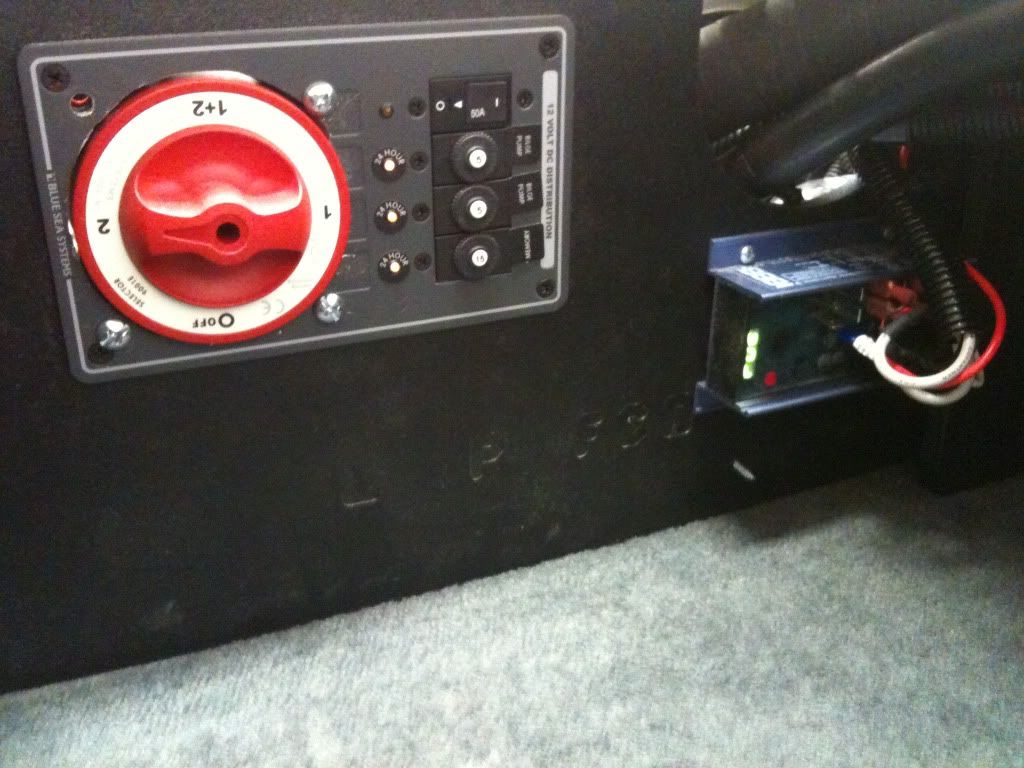
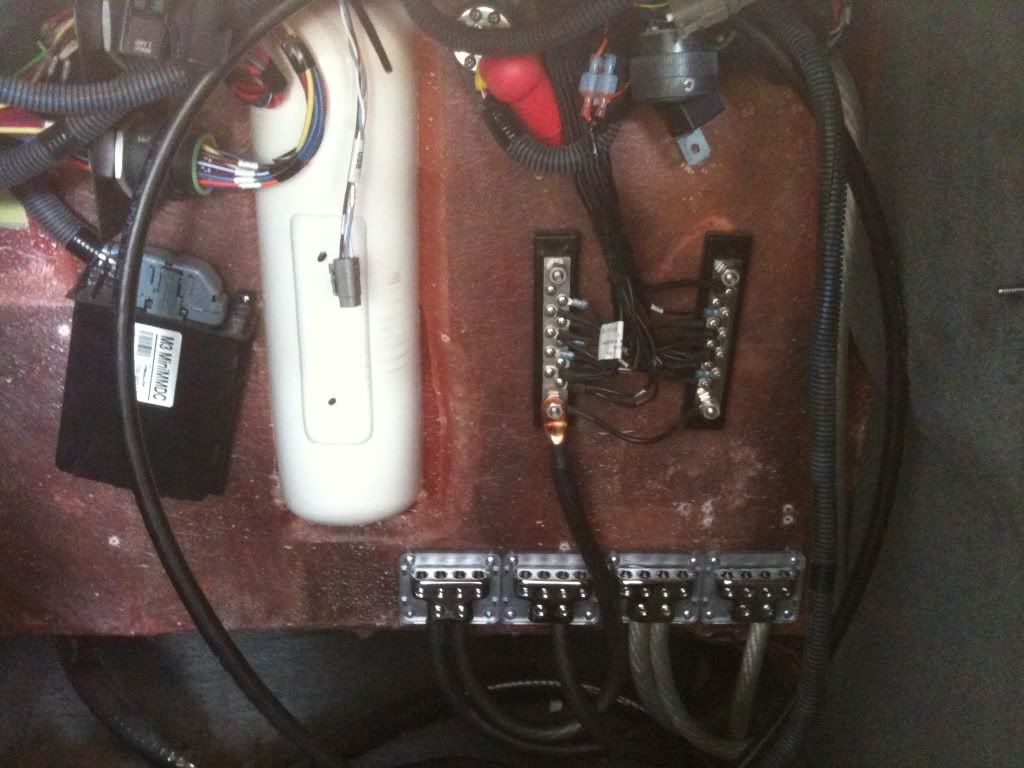
This is a Pic of the Breaker pannel and a shot of the Balmar Digital MC 612 Voltage regulator, (The Blue Box) This is what you program to tell the alternator what kind of batterys you have and it sets up charge programs depending on what type of batterys your running.
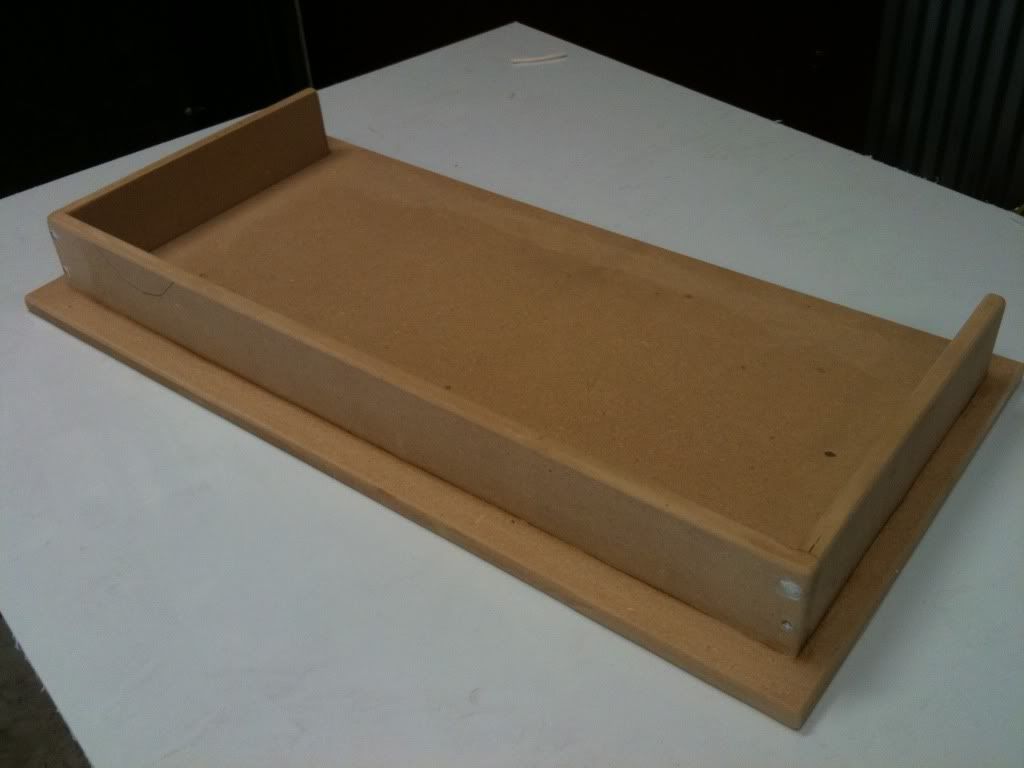
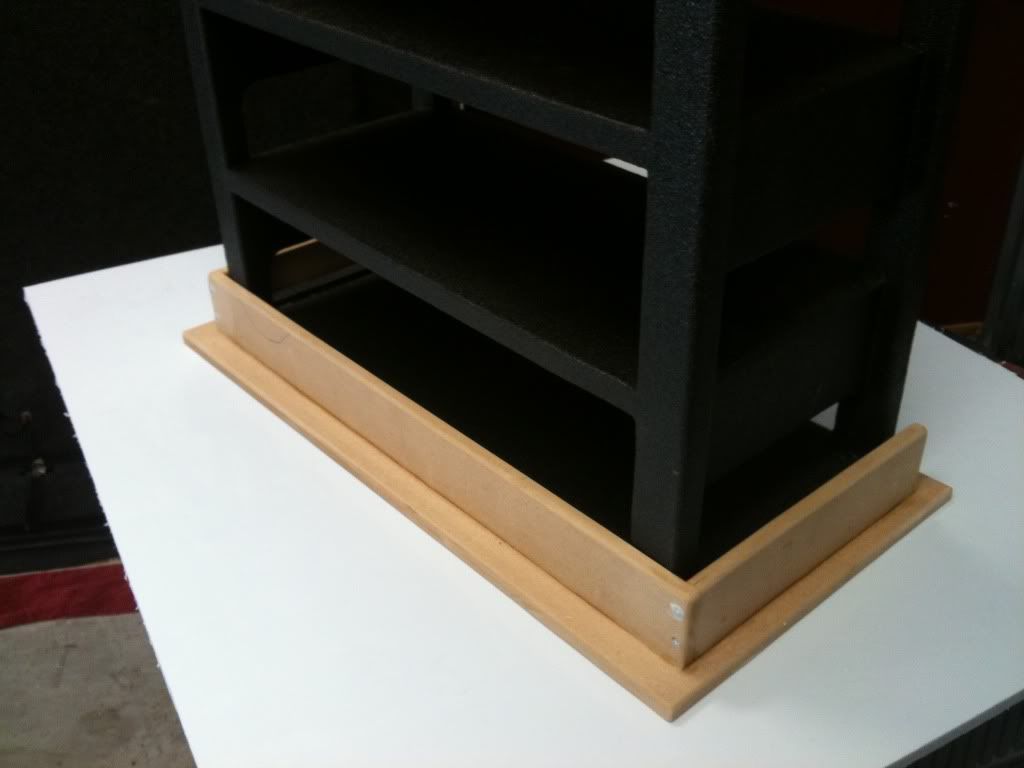
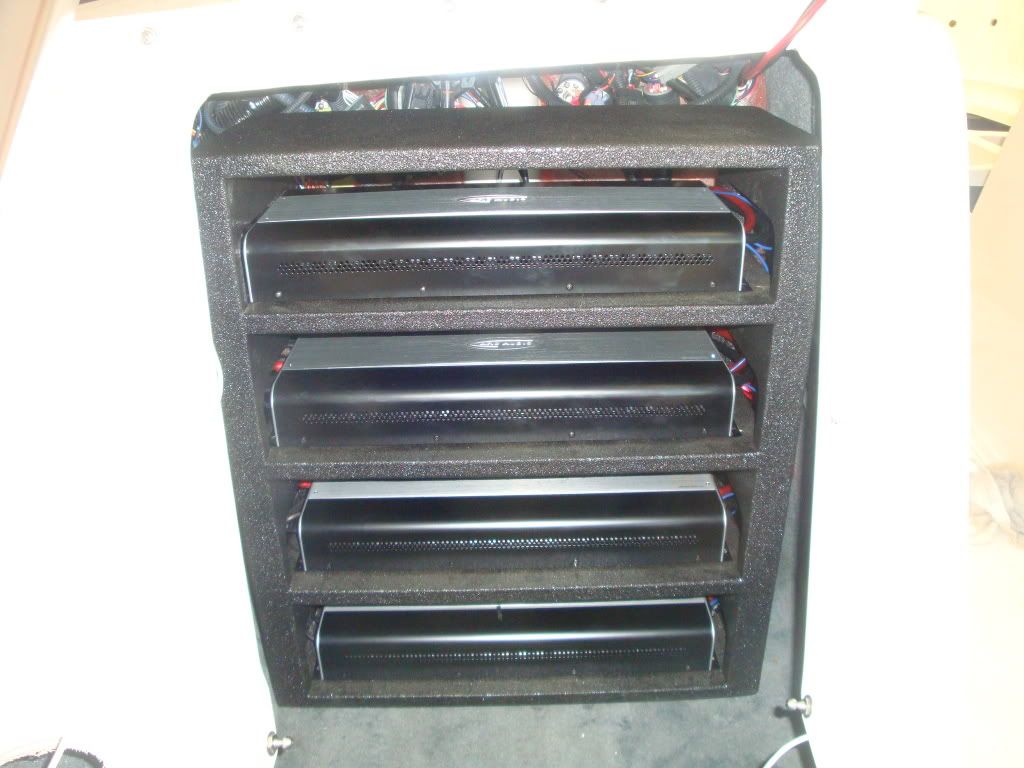
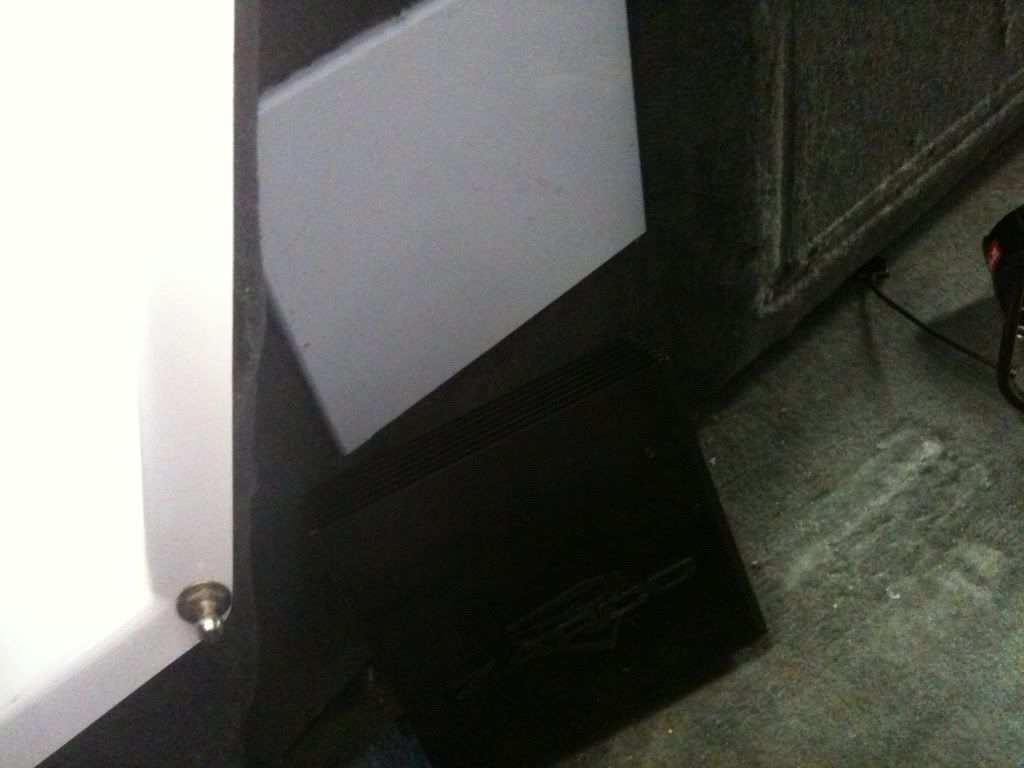
This is a Tray that the Amp Rack is going to sit in, Its going to do 2 things its gonna be a base or mount to hold the amp rack at the base, It also will help in the event he has a bunch of water flow into this area.
This is what it looks like with the amp rack sitting in the tray. The Rack will be mouted at the top of the rack to the side of the boat.
|
|
Join Date: Aug 2004
06-05-2011, 7:54 PM
|
Reply
|
|
Grant, do you audio installs for a living or just a side thing? Been following your installs and boat mods for years here on this site and I'm always impressed!
|
|
Join Date: Jun 2005
06-05-2011, 8:19 PM
|
Reply
|
|
Pat: No I do this as a hobby.
This system should be comming to life pretty soon. Yes it has taken a while. When you need somthing for a system like this you can almost Know that no one has what you need hanging on any shelf. But now that almost everything is built is comming together nice. Im running wire everywhere and All at once. it should be pretty fun when its done.
|
|
Join Date: Jul 2007
06-05-2011, 9:01 PM
|
Reply
|
|
pretty impressive my friend. Lots that goes into an install like this. Cant wait to see it finished!
|
|
Join Date: Nov 2008
06-10-2011, 4:58 PM
|
Reply
|
Quote:
Glue's
In general Bondo fine strand bondo glass works good. You have to mix it real good and the surface NEEDS to be rough, and you need to press it into the surface your gluing. If you just stick it to a piece of MDF or Plastic it can come right off. Thats why i do the cut lines and holes and sand the pieces Im glueing
Construction glues work great on flat surfaces. You cant or should not put the construction glues like Liquid Nails on to thick or it will never dry, So try and use that stuff in spots where it dosen't have to be stuck in 5 min's and you and use some tape to hold it down or clamp it. Again if there is more than 1/4 inch of glue needed to fill a gap or curve better use Bondo Glass or if its cold outside. Again make sure it's mixed real good and both surfaces are real rough it needs somthing to bight into. Glue's are somthing that's kinda tricky there is not one glue that works good for me for all applications. But if you have any ones I should try out let me know, I know they have some crazy 2 part epoxy's
|
so you're saying you use Bondo Glass to fix blocks to the fiberglass in the gunwhales for an amp rack to mount to? I used Liquid Nails on mine, gave it a week to dry, then mounted the amprack with 3 amps, and after the second time out the blocks came loose. Time to rebuild it, and I was thinking about just fiberglassing the blocks in. Any other recommendations?
|
|
Join Date: Mar 2006
06-13-2011, 11:30 AM
|
Reply
|
|
Bondo Glass works great for attaching backing blocks to the hull of the boat. As long as you prep the blocks similar to the way Grant has done above. Liquid Nails is OK, but I find that is does not hold up in most cases when mounting heavier equipment. LN works OK when bonding wood to wood, again assuming it is prepped well and not holding a ton of weight. Also helps if the boards you are mount are sitting on the floor to help carry the weight of the amps and all the adhesive does is keep them from pulling off the hull.
|
|
Join Date: Jun 2005
06-15-2011, 9:23 AM
|
Reply
|
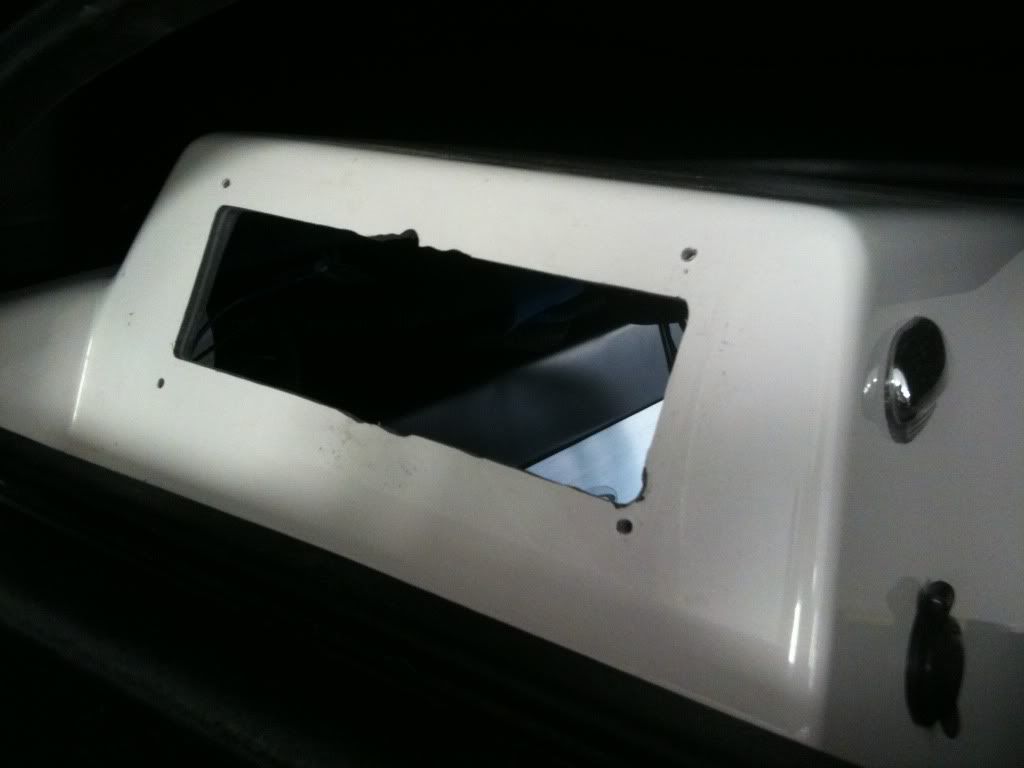
Ok: THE SYSTEM is ALIVE! Everything has power and Signal. No sound yett but getting close!
Had to Re-make the Head unit Face plate to fit the Boost box.

The is the Volume for the BASS I wanted it front and center so this seemd like a good place. Plus I can reach it from the passenger seat LOL

This is all his interior speaker wireing. This is where the "Service Loop" will connect to his amp (That's a fancy word for "Extra wire") So that the amp rack can stay connected and we can remove the rack and tune or adjust.
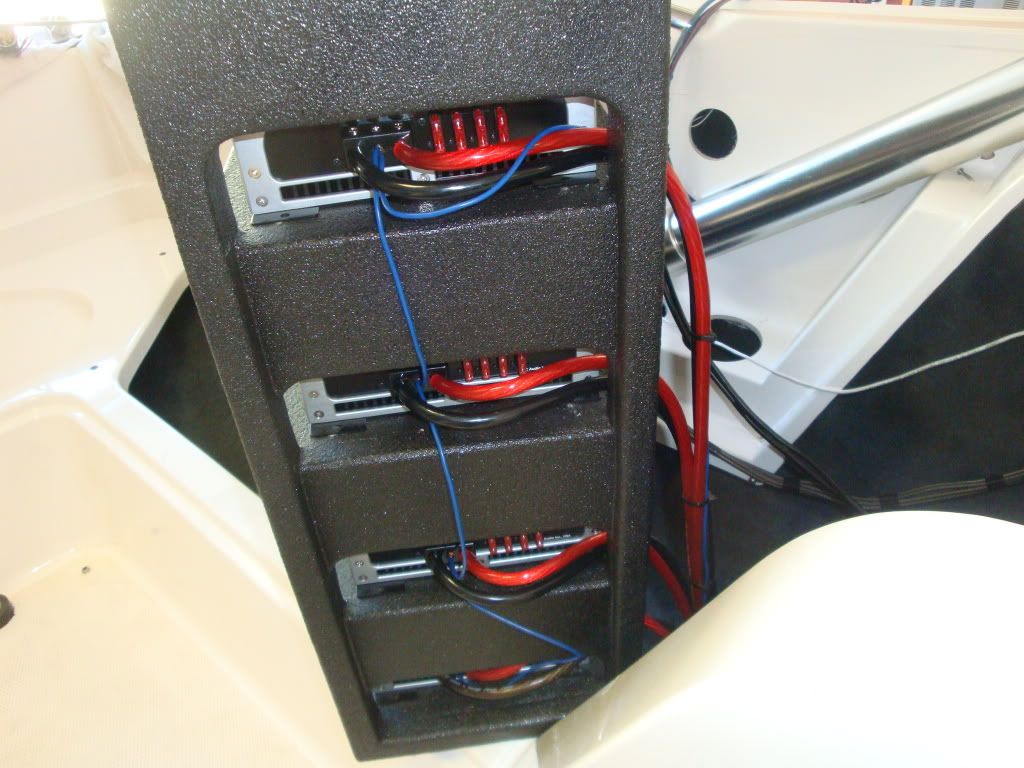
The Amps are in the rack and connected. This is how the rack can be pulled out and amp's can be adjusted and or you can get into the the area behind the drivers in just min's
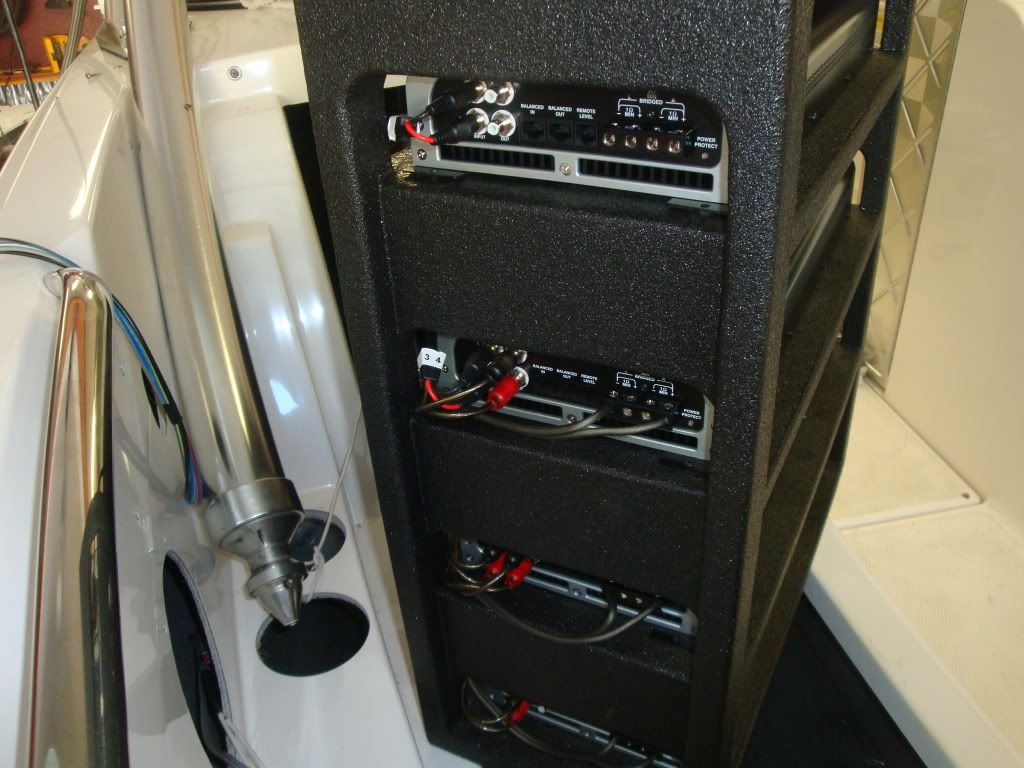
Here is a pic of the Amp rack base in its spot. This is what holds the rack in-place then its bolted at the top of the rack directley to the boat.

|
|
Join Date: Jun 2005
06-15-2011, 9:32 AM
|
Reply
|
I have to say I love installing in a big boat like this. After working in this Monster I don't think I ever want to install in somthing small like my boat "EVER AGAIN" LOL
The worst part of this boat is getting in and out of it. The trailer fender is so low and the top deck is so High it's a pain. Im making a bigger deal than it is but I swear I have gotten in and out of this boat over 2000 times and that's the worst part. When I hooked up the amp rack in the drivers compartment I was able to pull it out and sit indian style inside the drivers compartment. Im 6-1 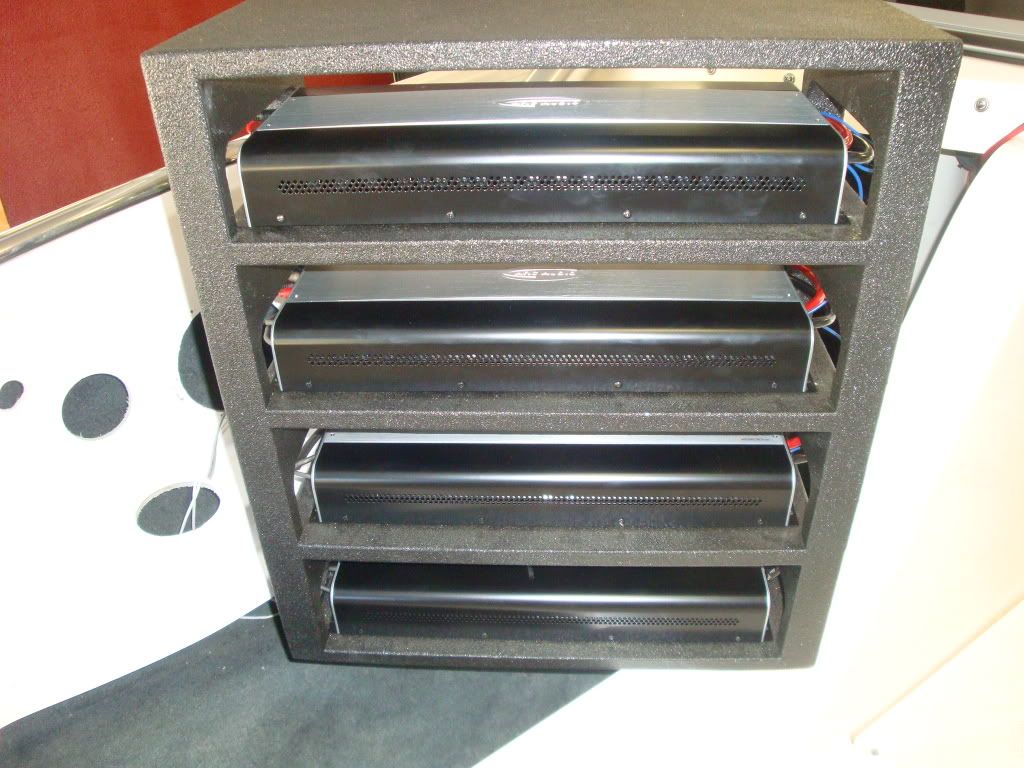
|
|
Join Date: May 2009
06-15-2011, 9:36 AM
|
Reply
|
|
It is looking awesome Grant!
|
|
Join Date: Jun 2005
06-15-2011, 9:42 AM
|
Reply
|
|
speaker layout
|
|
Join Date: Jul 2007
06-15-2011, 7:17 PM
|
Reply
|
|
that HU looks siiiiick!
|
|
Join Date: Apr 2006
06-15-2011, 10:40 PM
|
Reply
|
|
I hope my wife doesnt walk in to me jerkin' to these install pics... that would be awkward... looks amazing G! Like the HU ...
* Please accept my apology for the un-christian like comment posted above. It is merely a joke - an attempt at being funny.... All views expressed clayton191 on wakeworld [forums] are not to be construed as true or a realistic representation to the type of man I am...
Last edited by clayton191; 06-15-2011 at 10:41 PM.
Reason: updated terms of service
|
|
Join Date: Jul 2008
06-16-2011, 11:18 AM
|
Reply
|
|
Grant,
You don't by chance work in the industrial world?
This install on the wiring and lay out looks like how some of my panel builders work.
Especially using the fire resistant wire instead of speaker wire.
Sounds odd but I'ven even thought of running small cable trays and a plc in mine on the next install but thought that might be a little to industrial of a look.
|
|
Join Date: Jun 2005
06-22-2011, 2:32 PM
|
Reply
|
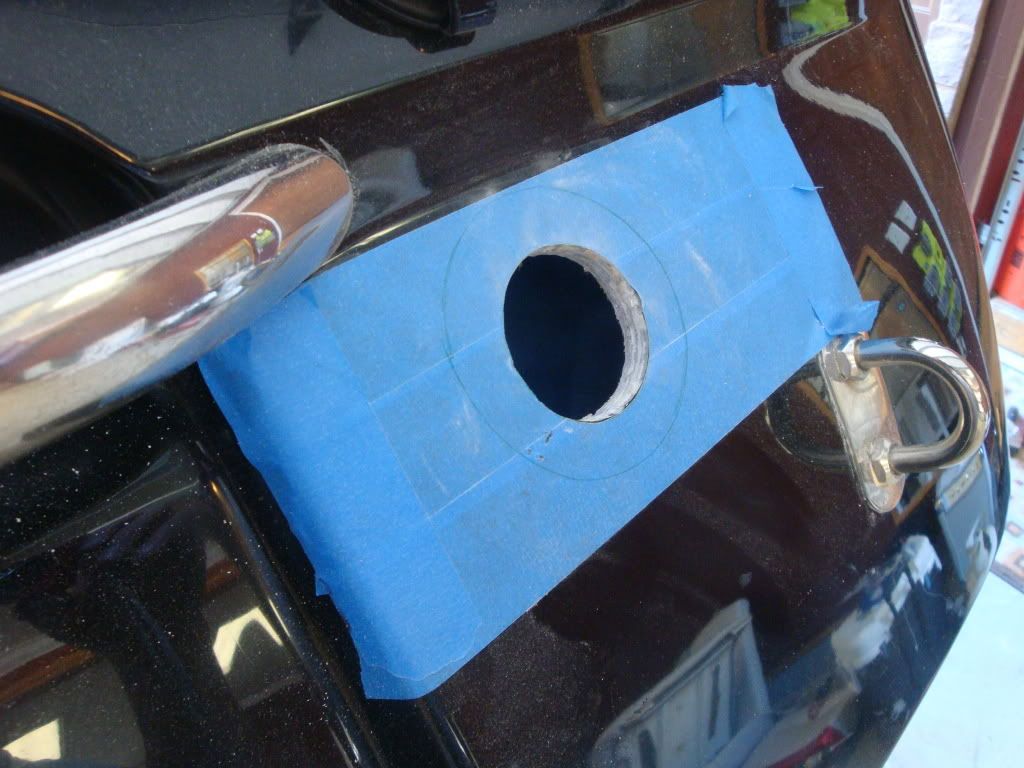
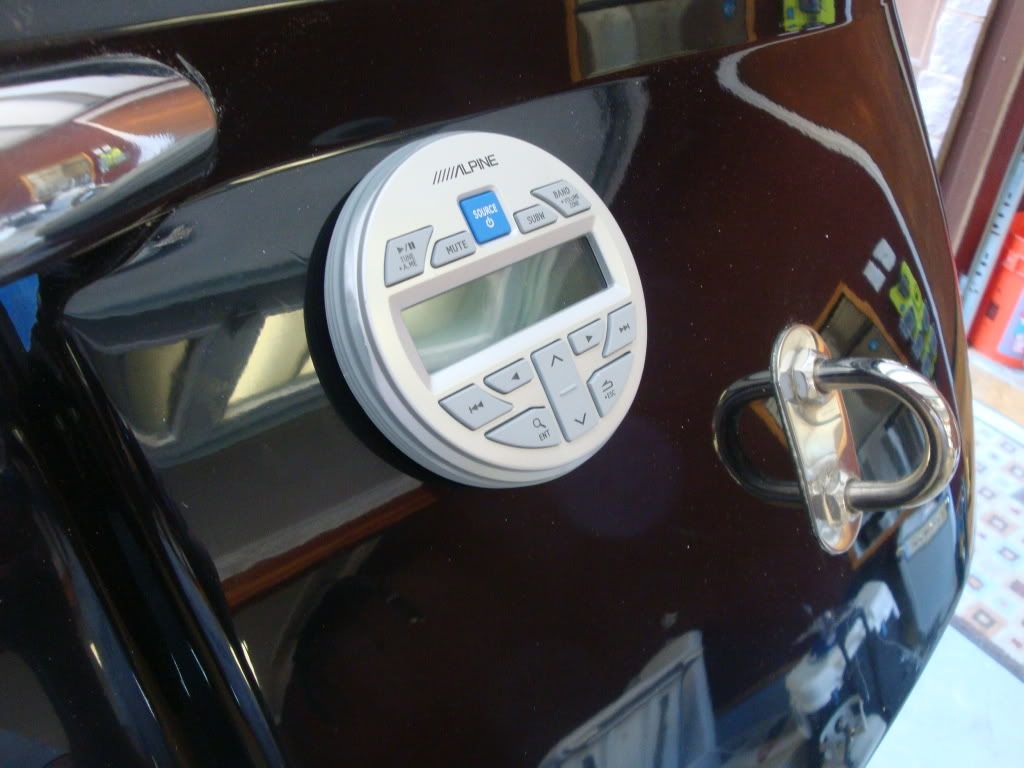
Here are some more Up-dates
This is the Display for the Xantrex True Charge. It's mounted driver side just infront of the cup holders. It has to almost be mounted like this for you te see the LED's for some reason if its mounted up and down its very hard to read the display, I figured if he ever got tired of it or went a diffrent direction he could tak it out and put a cup holder where this came out
Then it was time to install the rear remote
Blue tape
Mark where its gonna go
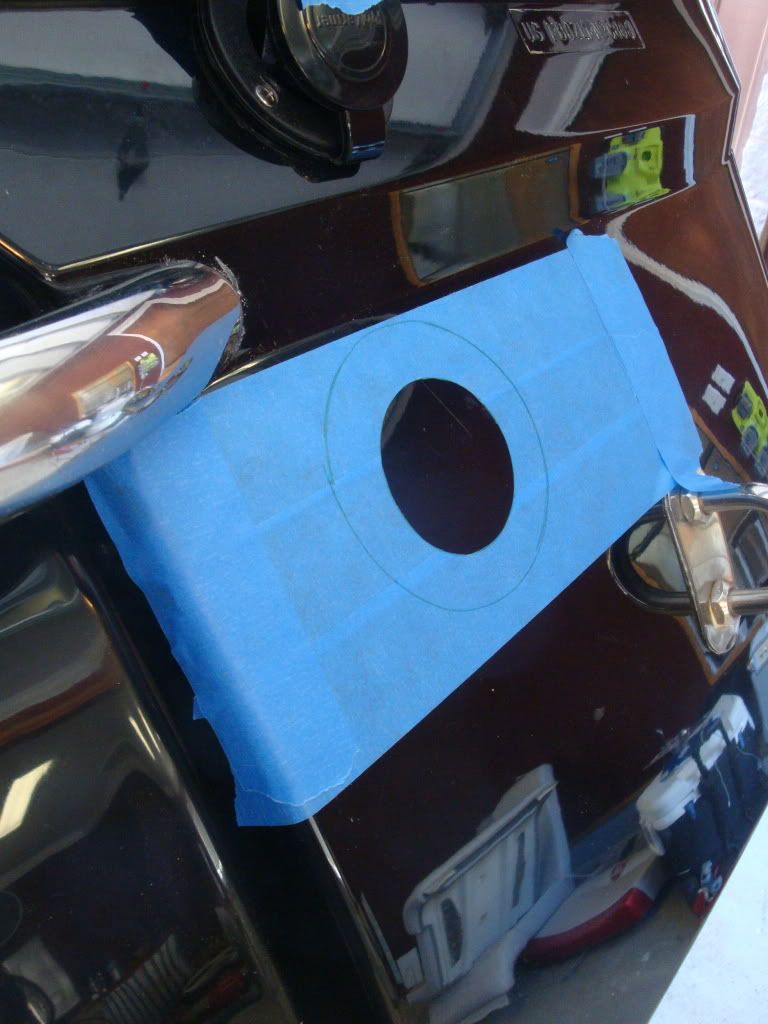
Drill some helper holes

finished hole
|
|
Join Date: Jun 2005
06-22-2011, 2:42 PM
|
Reply
|
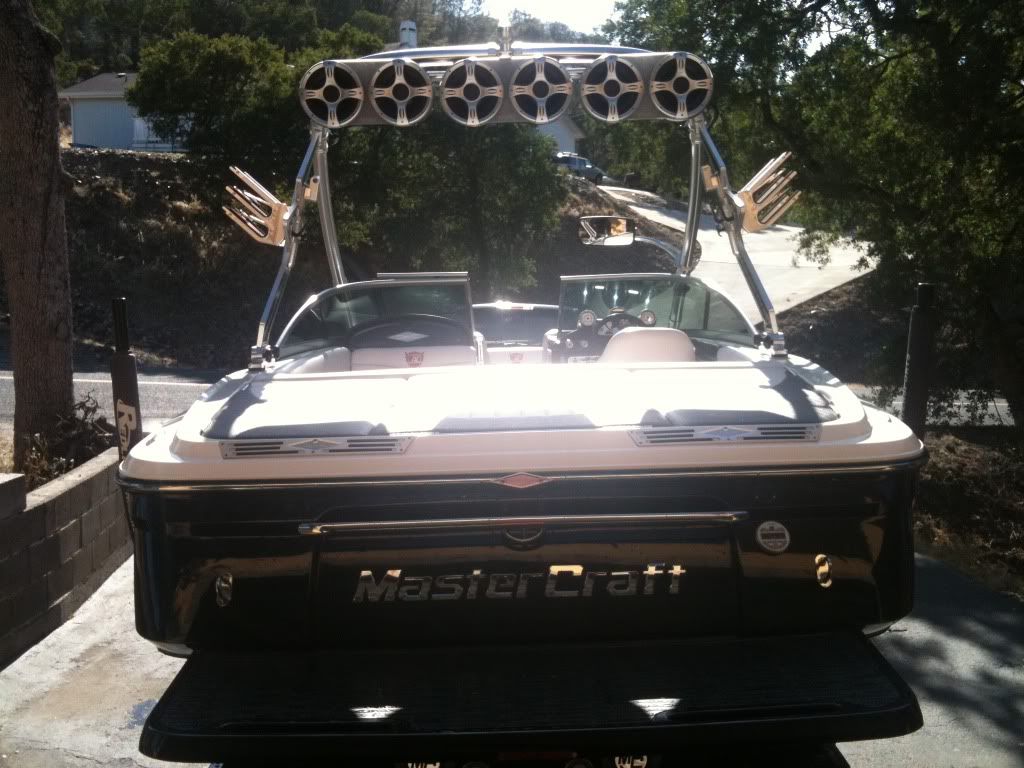
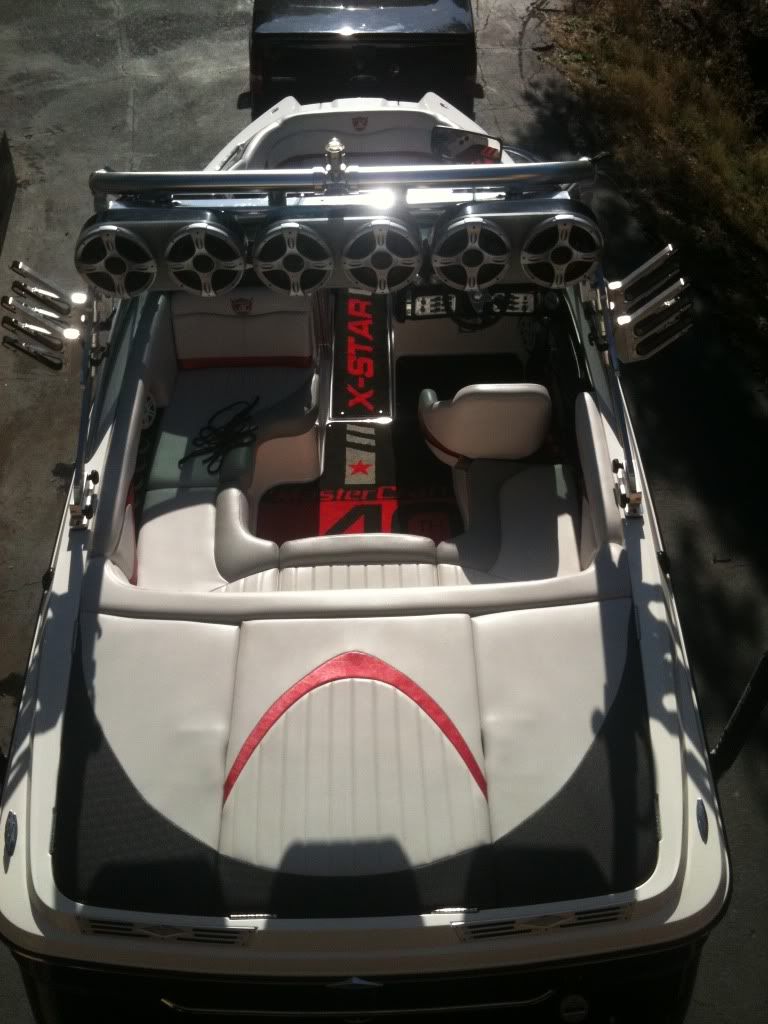
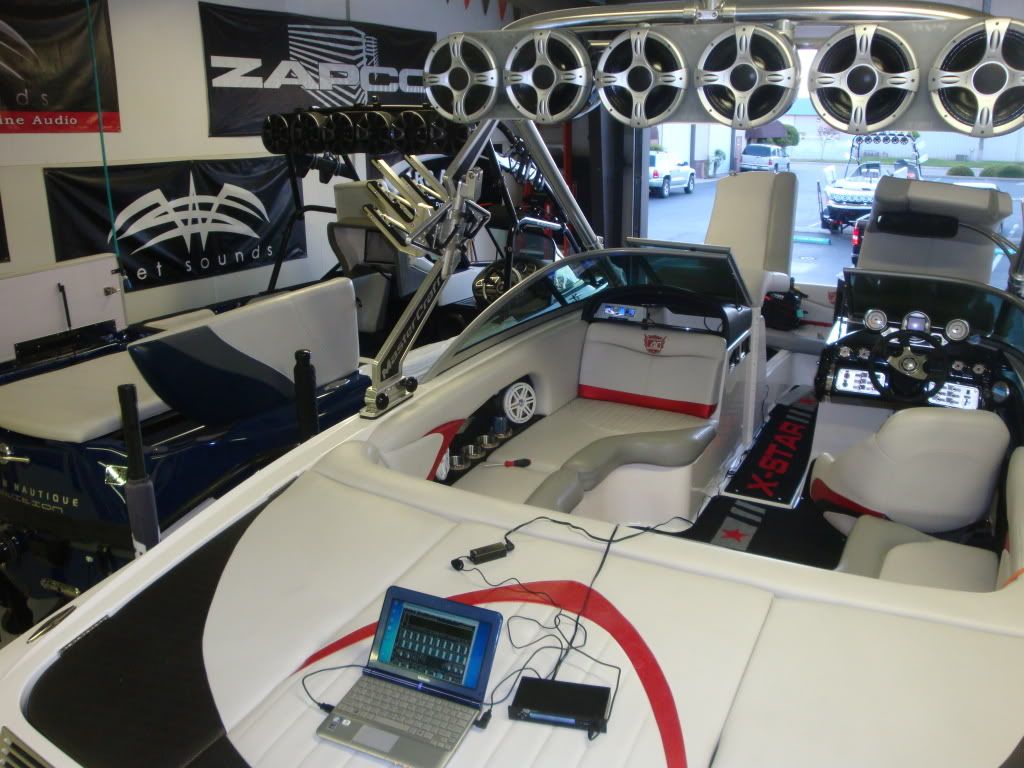
Here are some tower speaker pic's
This was a tricky project. We wanted the Speaker's to all sit on the same plane so from the back and side they would all be flush with each other. The upper Bar is curved in 3 diffrent directions. The bar has a very hard time mounting flat with the tower being so curved. The bar needed to be removable so that you could take it off and install the speakers onto the bar and then bolt the bar back to the tower.
Here is a Pick of 1 of the 4 stock mastercraft speaker mounts on the tower

This is a aluminum spacer block that bolt's to the tower and then creates a mount poit for the bar. This block is what the bar will bolt to.
The bar can now sit flat on the tower and bolt to these 2 mounting pointes "in the center". It also bolt's down the same way at either end's

The center works also as a spacer to create a level mounting point
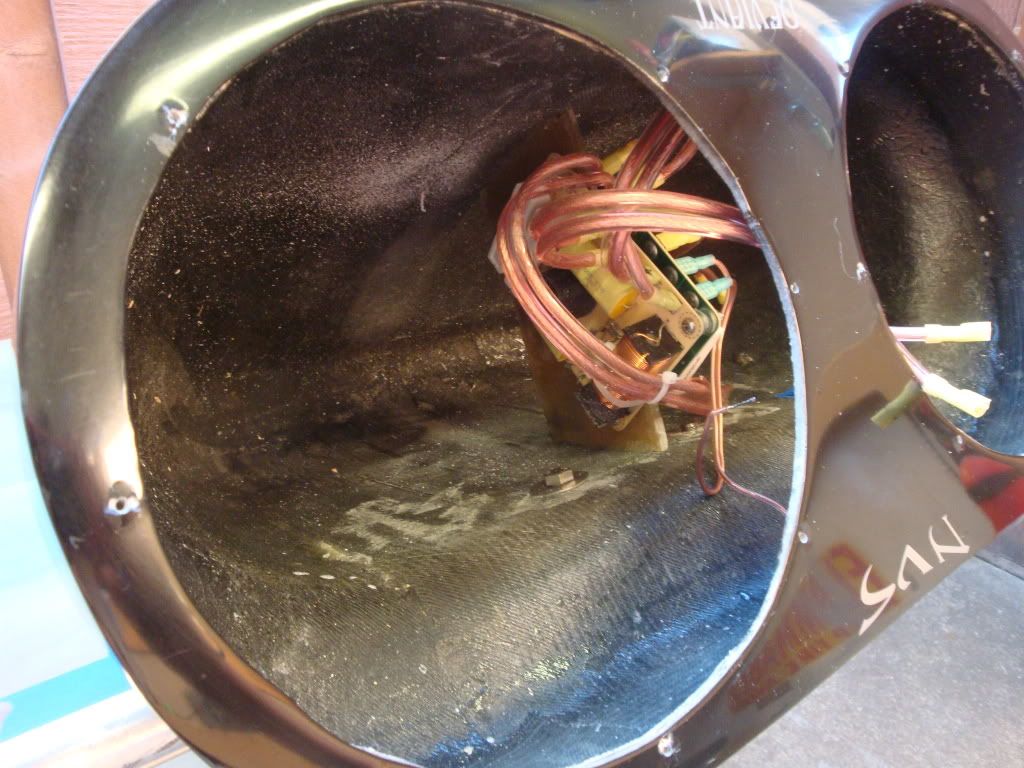
This system will have 3 NVS deviants across this bar.

Last edited by grant_west; 06-22-2011 at 2:45 PM.
|
|
Join Date: Jun 2005
06-22-2011, 2:56 PM
|
Reply
|
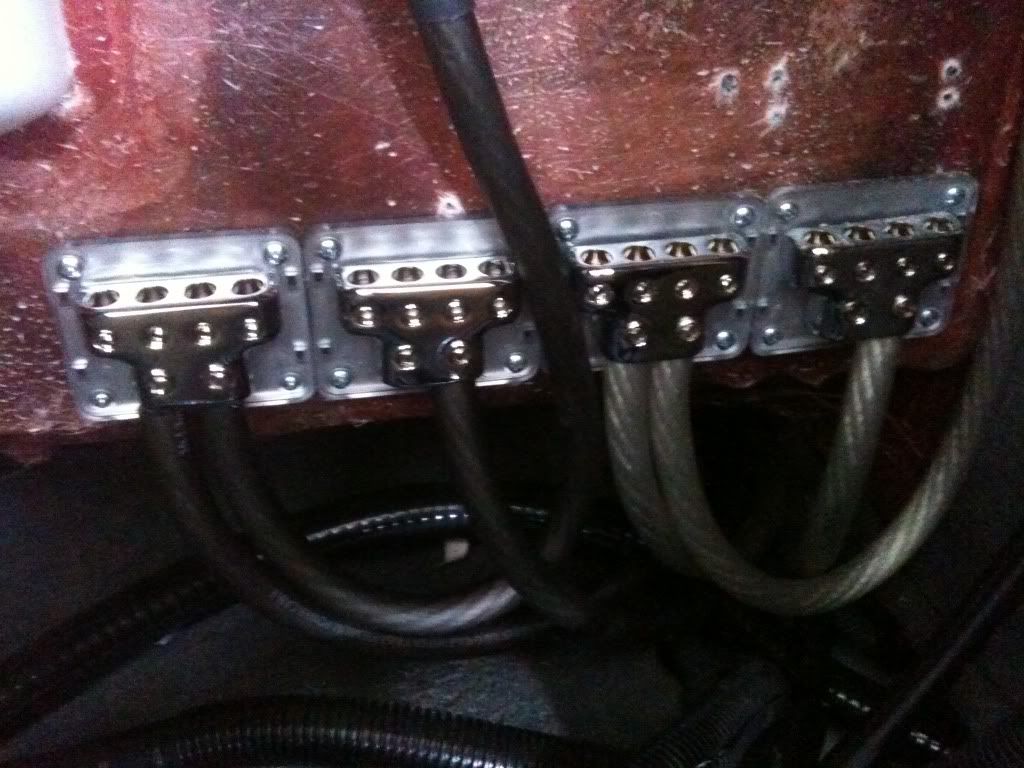
Here is what we decided to use for Sub Box connectors.
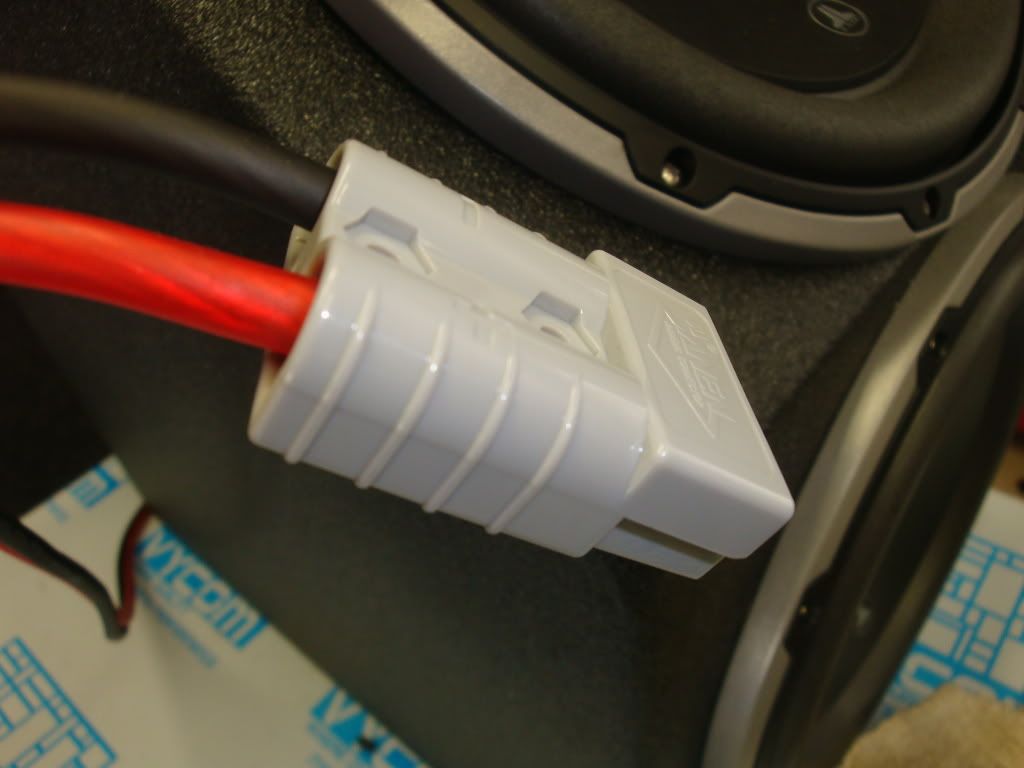
LOL at the warning lables all over this amp. It nice working with somthing that tells your "it's gonna kill you" if you hook it up wrong LOL No but Serious Im sure it would Mess u up! good if it zaped you. It has a pretty serious gaurd to shield you from the + and neg

|
|
Join Date: Jun 2005
06-22-2011, 3:01 PM
|
Reply
|
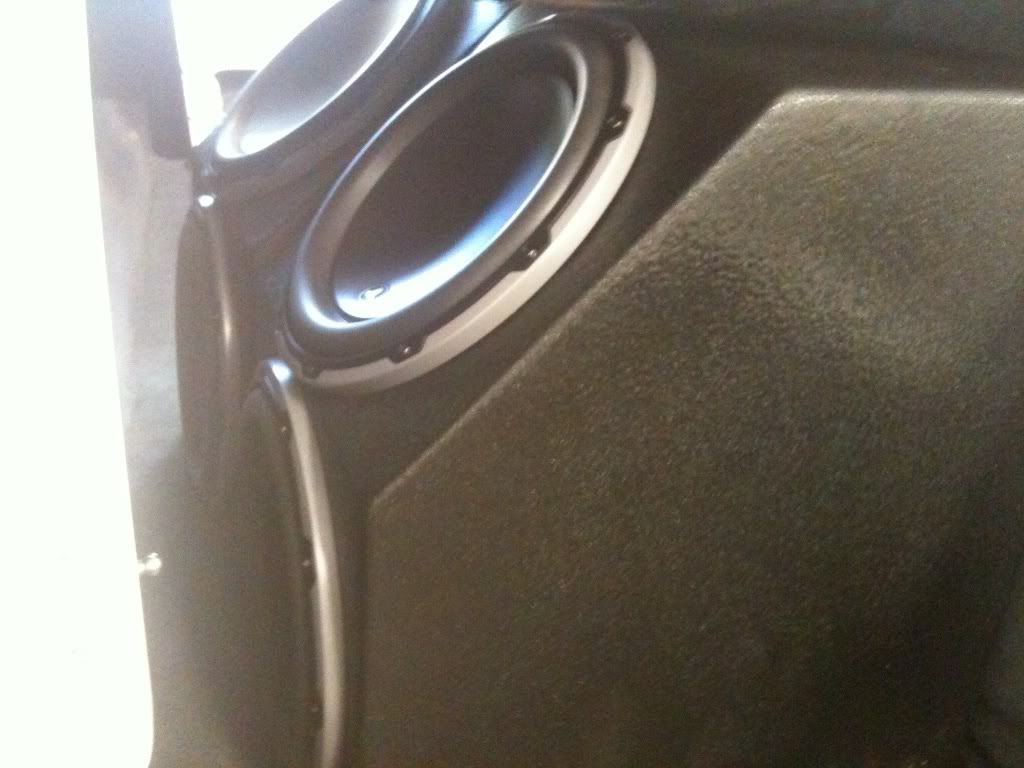
Here are the Sub's
|
|
Join Date: Jun 2004
06-22-2011, 3:11 PM
|
Reply
|
|
whoa. I almost posted for an update a couple hours ago. nice work G. keep em coming.
|
|
Join Date: Jun 2011
06-22-2011, 4:20 PM
|
Reply
|
|
dang, nice work! im very impressed
|
|
Join Date: Aug 2010
06-23-2011, 2:39 PM
|
Reply
|
|
I will say this, the work is impeccable, but you guys are INSANE! I mean that in the best possible way.
|
|
Join Date: Jun 2005
06-23-2011, 4:19 PM
|
Reply
|
Here is the RGB SMT strip's for the Cup holders. There is almost 15 foot of RGB in the cup holders alone. LOL

I thought I would shoot a short video of what I was doing so if anyone was thinking about doing some RGB here ya go.
http://www.youtube.com/watch?v=0E2C_gHopH4
Last edited by grant_west; 06-23-2011 at 4:21 PM.
|
|
Join Date: Jul 2009
06-23-2011, 11:36 PM
|
Reply
|
|
looks good grant. have you found a RGB strip that has more lights per inch? This was the reason we stayed away from RGB in my boat, The solid colors had a least 4 times more lights per strip.
|
|
Join Date: Jun 2005
06-24-2011, 7:58 AM
|
Reply
|
|
Brian: I think the stuff Im using is 130 they have 140 and 150 per inc. RGB need's a micro-chip between LED's unlike regular single color LED's plus RGB led's have 3 LEDs in each LED so they tend to be a bit larger. IMO its not how many lights you have per inch but how much light they put out and the angle that they throw the light. And the amount of lights we are putting in each boat the LEDs could be half the brightness and they would STILL light the whole boat no problem.
I can understand when your using a single LED like a transome light You NEED as much light out of the single light as possable but when you are spreading the light around with more than one light you can back off a bit.
|
|
Join Date: Aug 2003
06-26-2011, 10:57 AM
|
Reply
|
|
One more thing about these RGB strips. After getting a ticket for having Blue LEDs I decided to go to RGBs on my boat. The RGBs I sourced had the resistors placed lengthwise along the strip. When I bent the strips around my cupholders or speaker rings the bending radius was too sharp causing the resistor solder joints to fail. I notice Grant's RGBs have the resistors oriented perpindicular to the strips (the little black rectangles). When you are shopping for RGBs make sure the resistors are oriented as shown on Grants or you will have nothing but troubles. I got so frustrated in the process that I just gave up and changed all of mine out to white instead.
|
|
Join Date: Nov 2008
06-27-2011, 4:33 AM
|
Reply
|
|
A seller called "Torchstar" on ebay sells the RGB's in 5M rolls with 300 LED's. I've used them on several installs and they seem to be almost as bright as the standard colors.
|
|
Join Date: Apr 2011
06-27-2011, 9:27 AM
|
Reply
|
|
swinging for the fence are we? looks awesome G. cant wait to see more!
|
|
06-27-2011, 10:32 AM
|
Reply
|
|
Daktronics makes the best led /rgb systems in the world, rightnhere in the USA. They do more large scale stuff, but they have led control down.
|
|
Join Date: Jun 2005
06-27-2011, 2:23 PM
|
Reply
|
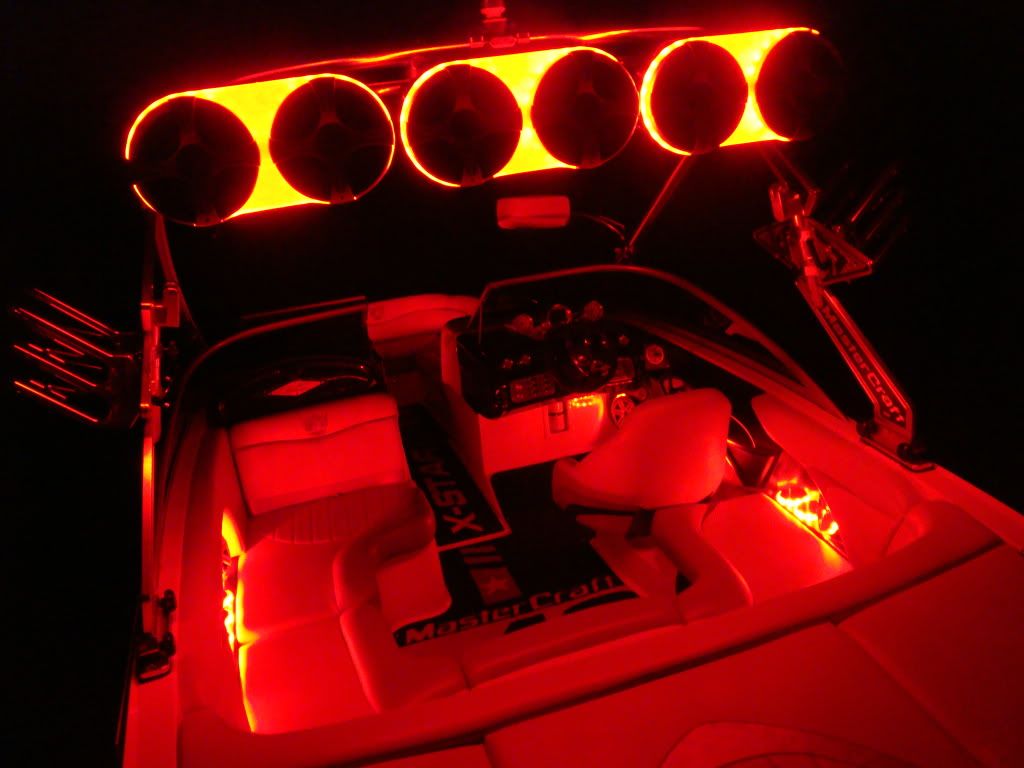
|
|
|
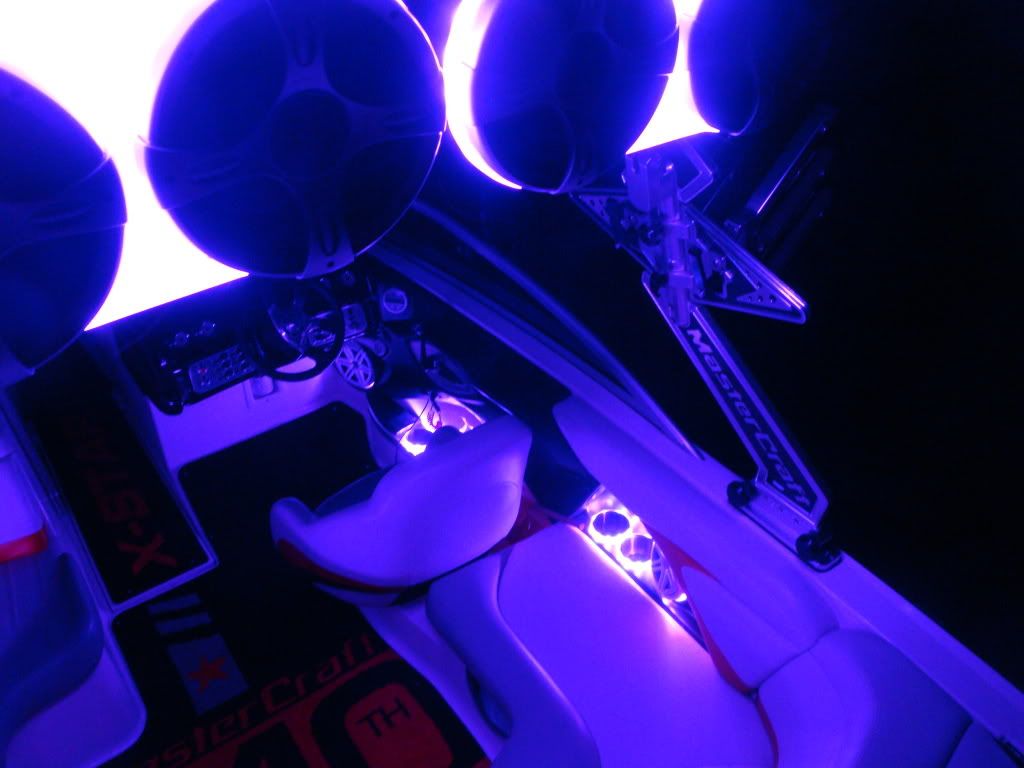
Join Date: Jun 2005
06-27-2011, 2:24 PM
|
Reply
|
|
|
|
Join Date: Jun 2004
06-27-2011, 2:26 PM
|
Reply
|
|
wow- is the audio all done? how does it sound?
|
|
Join Date: Jun 2005
06-27-2011, 2:28 PM
|
Reply
|
|
|
|
Join Date: Oct 2006
06-27-2011, 2:54 PM
|
Reply
|
|
WEll Grant you out did your self on this one...You could say my dream ride! Good job foo, cant wait to check it out up close.
|
|
Join Date: Dec 2005
06-27-2011, 3:03 PM
|
Reply
|
|
wow
|
|
Join Date: Aug 2006
06-27-2011, 3:45 PM
|
Reply
|
|
Did you change out the entire front of the NVS enclosure? It appears as thought the entire thing is glowing not just around the speakers.
|
|
Join Date: Apr 2005
06-27-2011, 4:08 PM
|
Reply
|
|
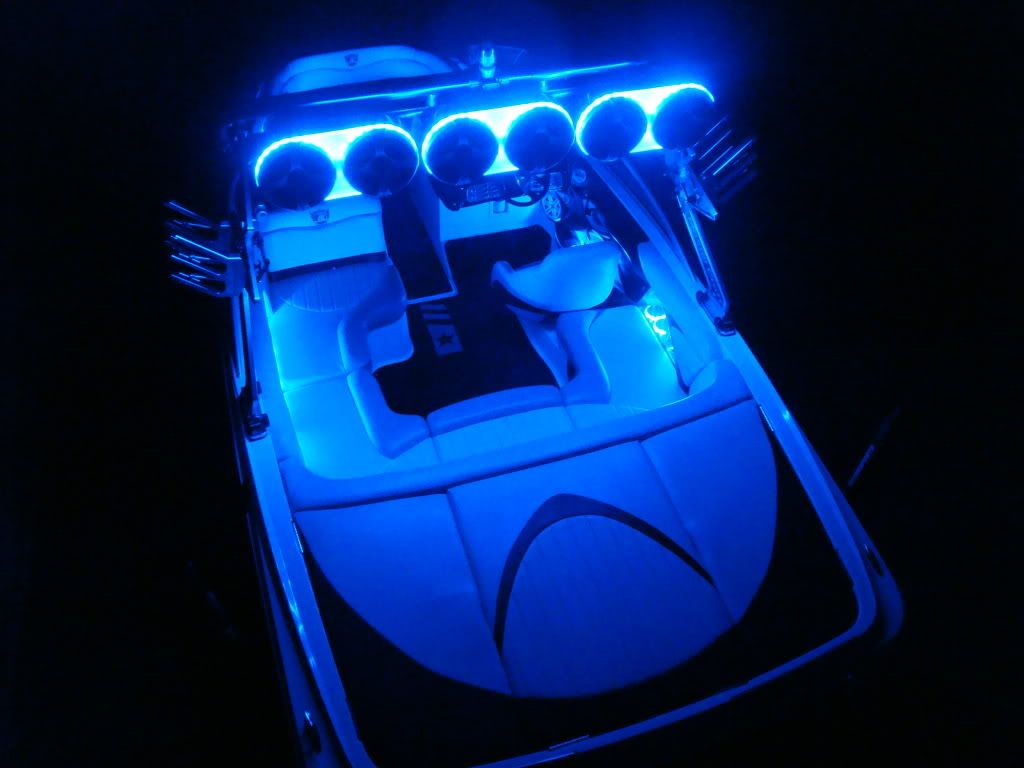
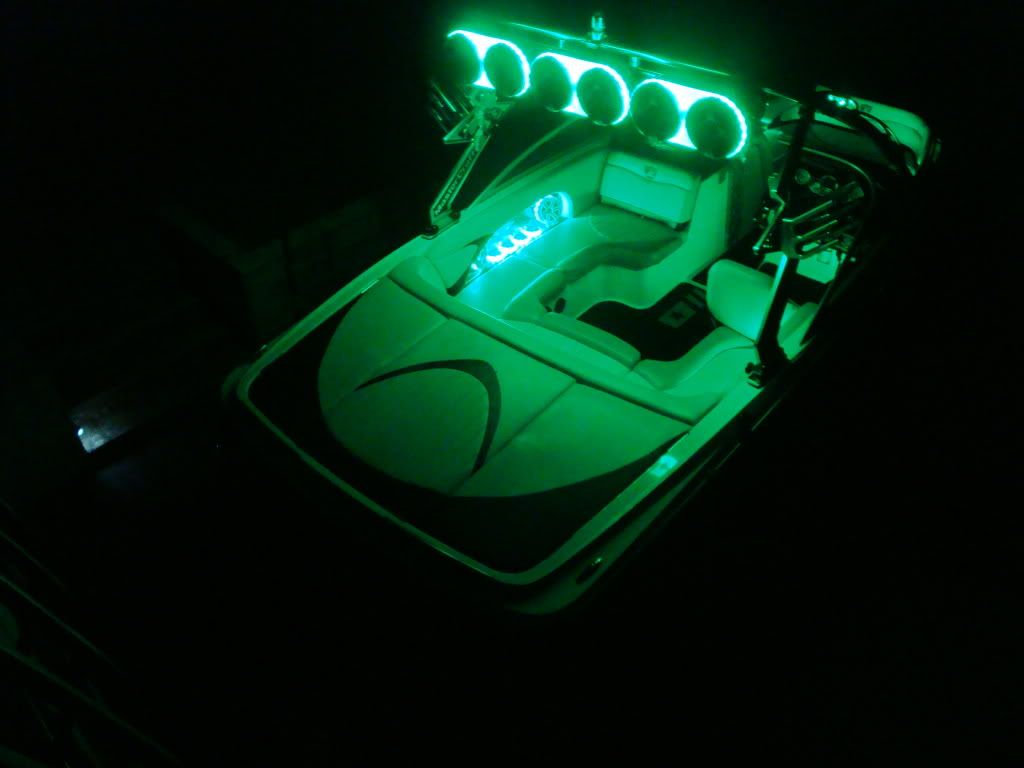
The system is up and running. Grant still has a little more tuning to do and is getting some help from Ryan at Chucktronics and Clay. The system sounds amazing and the bass is intense. I can't wait for the Zapco EQ to get dialed in - which is a complicated piece of equipment. So many adjustments. He didn't change out the front of the NVS enclosure, he decided instead of just doing rings that we should run the plexy across the front of the entire enclosure. It looks awesome and you wouldn't believe how much light it puts out.
|
|
Join Date: Mar 2010
06-27-2011, 5:35 PM
|
Reply
|
|
Very Nice Grant. Looks Great very very clean!!!
|
|
Join Date: Aug 2006
06-27-2011, 5:48 PM
|
Reply
|
Quote:
|
He didn't change out the front of the NVS enclosure, he decided instead of just doing rings that we should run the plexy across the front of the entire enclosure. It looks awesome and you wouldn't believe how much light it puts out.
|
Thanks. Yeah it looks amazing and very bright.
|
|
Join Date: Jun 2005
06-27-2011, 9:32 PM
|
Reply
|
|
So Now I have to start cutting some holes in the boat to VENT. The Bass that's trying to escape is causing a bunch of un wanted vibration and making the system sound crappy. Its like I have to take care of any rattles before we can put a decent tune on the boat. I remember when I did my boat I had the same problem. The more you can vent the better the sound and the more of it. Cutting holes in some ones boat might not seem like a good idea but you don't go this far and then just stop. I wanted to see and feel how much pressure from the bass I needed to vent before I started cutting any vents. After this weekends little test run I have a pretty good idea I got to cut some major vents in this boat. Im gonna bring it in to Chucktronics for a Tune and see how it sounds. If I need more vents I can add some more down the road.
|
|
Join Date: Jul 2009
06-28-2011, 8:01 AM
|
Reply
|
|
looks good Grant. I need to need look into adding some extra venting in mine after adding the two other XXX's. Look forward to see more pics.
|
|
Join Date: Jun 2005
07-06-2011, 10:14 AM
|
Reply
|
Here is a short video we took this weekend
http://www.youtube.com/watch?v=l9mVEZhwCog
|
|
Join Date: Jul 2009
07-06-2011, 10:18 AM
|
Reply
|
|
grant can you post some more finished photos of where the subs and amps are etc. great work.
Last edited by factorykitted; 07-06-2011 at 10:24 AM.
|
|
 Posting Rules
|
You may not post new threads
You may not post replies
You may not post attachments
You may not edit your posts
HTML code is On
|
|
|
All times are GMT -7. The time now is 12:42 PM.
|
|


 Linear Mode
